Model Training with PyTorch
What is PyTorch?
PyTorch is an open-source deep learning framework with the following features:
-
Dynamic Computation Graphs: PyTorch uses dynamic computation graphs, meaning you can construct, modify, and execute the computation graph at runtime. Compared to static computation graph frameworks, this flexibility makes debugging easier and allows for more natural expression of complex model structures and control flows. For example, during the exploration and experimentation phases of model development, you can adjust the model structure and computation flow on the fly without rebuilding the entire graph.
-
Easy-to-Use API: PyTorch offers a simple and intuitive API that enables developers to get started quickly. Whether building simple neural networks or complex deep learning models, PyTorch’s API helps you achieve your goals with relatively few lines of code. For instance, defining a neural network only requires subclassing the
torch.nn.Moduleclass and implementing theforwardmethod. -
Powerful GPU Acceleration: PyTorch leverages the computational power of GPUs to speed up model training and inference. By transferring data and models to the GPU, you can significantly increase computational speed, especially for large datasets and complex models. You can easily switch between GPU and CPU using the
torch.cudamodule.
Application Scenarios
-
Computer Vision: PyTorch is widely used in tasks such as image classification, object detection, and image segmentation. Many state-of-the-art computer vision models, such as ResNet and Faster R-CNN, are implemented using PyTorch. Developers can take advantage of PyTorch’s rich set of image processing tools and libraries to quickly build and train efficient computer vision models.
-
Natural Language Processing: PyTorch provides robust support for NLP tasks like text classification, machine translation, and language modeling. Its dynamic computation graphs and flexible API make it easier to handle variable-length sequence data. Additionally, the PyTorch community offers many pre-trained language models and tools to facilitate NLP task development.
-
Reinforcement Learning: PyTorch is also extensively applied in reinforcement learning. It can be combined with various RL algorithms to help developers build and train agents. For example, PyTorch can be used to implement Deep Q-Networks (DQN), policy gradient algorithms, and other RL techniques for solving decision-making tasks in games and real-world scenarios.
Example
This section provides a simple example to demonstrate how to use PyTorch to build a basic machine learning task for processing structured data (similar to two-dimensional table data) and performing classification based on it.
The example simulates a basic scenario: a model predicts whether a product is popular based on its price and rating. The popularity criterion is defined as price + rating > 10. We will generate product data (price and rating) for model training and evaluate its accuracy.
Prerequisites
- Complete the Instance Creation process, ensuring that the image with PyTorch is selected. The instance must not be in no-GPU mode.
Download Example Code
NOTE: The source code is attached at the end of this document. If GitHub access fails, you can paste the code directly.
Download the example code from GitHub:
git clone https://githubfast.com/matrixorigin/demo.cdc.datenfab.com-docs.git
The example code completes the following tasks:
-
Dataset Generation: Randomly generates 800 training samples and 200 test samples, each with two features: price and rating. The label is determined by the rule
price + rating > 10. If the condition is met, the label is "popular" (1); otherwise, it is "not popular" (0). -
Model Training: Trains the neural network model on the training data for five epochs, printing the current loss value after each epoch.
-
Model Testing: Evaluates the model's accuracy on the test set and prints the results.
-
Single Sample Prediction: Makes a prediction for a given product with a price of 7.5 and a rating of 3.0, outputting whether the product is popular or not.
Running the Code
The example code is located in the demo.cdc.datenfab.com-docs/static/demo directory.
cd demo.cdc.datenfab.com-docs/static/demo
python pytorch-demo.py
Results
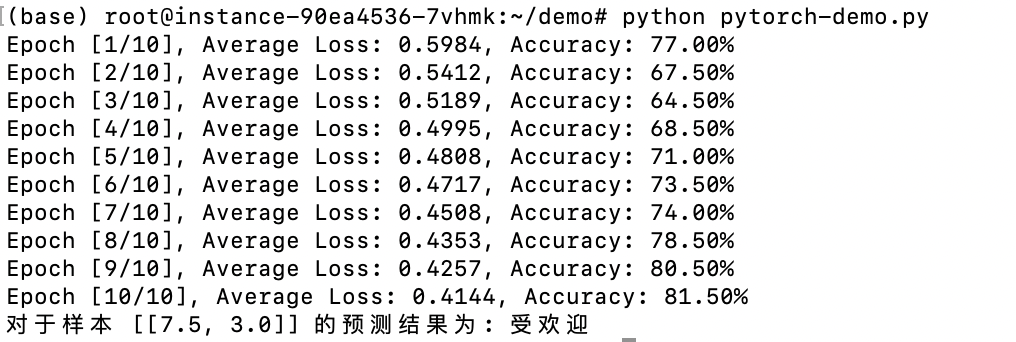
During 10 epochs of training, the loss decreased from 0.5984 to 0.4144, indicating that the model is effectively learning how to predict the target value (whether a product is popular) based on the input features (price and rating).
The final test accuracy reached 81.50%, demonstrating the model's performance on new data. This result shows that the model performs well in the classification task, though its performance can be further improved by increasing the number of training epochs or adjusting hyperparameters.
For the input sample [[7.5, 3.0]], the model's prediction is "popular." According to the data generation rule, the label for this sample should be 1, since the sum of the price and rating (7.5 + 3.0 = 10.5) is greater than 10. Therefore, the model correctly identifies this sample as "popular."
Monitoring Model Training with TensorBoard
TensorBoard is TensorFlow's official visualization tool, helping users better understand and analyze the training process. demo.cdc.datenfab.com has built-in support for this tool, with training logs recorded in the /root/tensorboard-logs directory. For more information, see TensorBoard.

Click TensorBoard to open the TensorBoard panel.

- Loss/train: Records the training loss for each batch.
- Accuracy/test: Records the model’s accuracy on the test set at the end of each epoch.
With TensorBoard, you can intuitively monitor the model's learning progress, analyze performance changes during training, and make adjustments accordingly.
example code
import torch
import torch.nn as nn
import torch.optim as optim
from torch.utils.data import DataLoader, TensorDataset
import numpy as np
from torch.utils.tensorboard import SummaryWriter

# 1. Generate a simulated dataset
def generate_data(num_samples):
    # Randomly generate product prices and ratings
    prices = np.random.uniform(1.0, 10.0, size=(num_samples, 1))  # Prices range from 1.0 to 10.0
    ratings = np.random.uniform(1.0, 5.0, size=(num_samples, 1))  # Ratings range from 1.0 to 5.0

    # Labels: Assume products with price + rating > 10 are "popular" (label 1), otherwise "not popular" (label 0)
    labels = (prices + ratings > 10).astype(int).reshape(-1)

    # Convert data to PyTorch tensors
    X = torch.tensor(np.hstack((prices, ratings)), dtype=torch.float32)
    y = torch.tensor(labels, dtype=torch.long)

    return X, y


# 2. Define a simple neural network model
class SimpleNet(nn.Module):
    def __init__(self):
        super(SimpleNet, self).__init__()
        self.fc1 = nn.Linear(2, 32)  # Input layer: 2 features (price and rating), 32 neurons
        self.fc2 = nn.Linear(32, 2)  # Output layer: 2 classes (popular or not popular)

    def forward(self, x):
        x = torch.relu(self.fc1(x))
        x = self.fc2(x)  # Output raw scores, no need for softmax
        return x


# 3. Training function
def train(model, train_loader, test_loader, criterion, optimizer, device, writer):
    model.train()  # Switch to training mode
    for epoch in range(10):  # Train for 10 epochs
        total_loss = 0
        for i, (data, labels) in enumerate(train_loader):
            data, labels = data.to(device), labels.to(device)

            optimizer.zero_grad()  # Clear gradients
            outputs = model(data)  # Forward pass
            loss = criterion(outputs, labels)  # Compute loss
            loss.backward()  # Backward pass
            optimizer.step()  # Update weights
            total_loss += loss.item()  # Accumulate loss
            # Record loss to TensorBoard
            writer.add_scalar('Loss/train', loss.item(), epoch * len(train_loader) + i)

        average_loss = total_loss / len(train_loader)
        # Test the model and print accuracy
        accuracy = test(model, test_loader, device, writer, epoch)
        print(f'Epoch [{epoch + 1}/10], Average Loss: {average_loss:.4f}, Accuracy: {accuracy:.2f}%')


# 4. Testing function
def test(model, test_loader, device, writer, epoch):
    model.eval()  # Switch to evaluation mode
    correct = 0
    total = 0
    with torch.no_grad():  # No need to compute gradients
        for data, labels in test_loader:
            data, labels = data.to(device), labels.to(device)
            outputs = model(data)
            _, predicted = torch.max(outputs, 1)  # Get predictions
            total += labels.size(0)
            correct += (predicted == labels).sum().item()

    accuracy = 100 * correct / total
    # Record accuracy to TensorBoard
    writer.add_scalar('Accuracy/test', accuracy, epoch)
    return accuracy


# 5. Predict function for a specific sample
def predict(model, sample, device):
    model.eval()  # Switch to evaluation mode
    with torch.no_grad():  # No need to compute gradients during prediction
        sample = torch.tensor(sample, dtype=torch.float32).to(device)
        output = model(sample)
        _, predicted = torch.max(output, 1)  # Get prediction
        return predicted.item()


# Main function
def main():
    device = torch.device('cuda' if torch.cuda.is_available() else 'cpu')

    # Create a TensorBoard writer
    writer = SummaryWriter(log_dir='/root/tensorboard-logs')

    # Generate random training and testing data
    X_train, y_train = generate_data(800)  # Generate 800 training samples
    X_test, y_test = generate_data(200)  # Generate 200 testing samples

    # Wrap data in TensorDataset
    train_dataset = TensorDataset(X_train, y_train)
    test_dataset = TensorDataset(X_test, y_test)

    # Load data using DataLoader
    train_loader = DataLoader(train_dataset, batch_size=32, shuffle=True)
    test_loader = DataLoader(test_dataset, batch_size=32, shuffle=False)

    # Create the neural network model
    model = SimpleNet().to(device)

    # Define loss function and optimizer
    criterion = nn.CrossEntropyLoss()  # Use cross-entropy loss
    optimizer = optim.SGD(model.parameters(), lr=0.01)  # Use stochastic gradient descent

    # Train the model
    train(model, train_loader, test_loader, criterion, optimizer, device, writer)

    # Predict for a specific sample
    sample = [[7.5, 3.0]]  # Product price 7.5, rating 3.0
    prediction = predict(model, sample, device)
    print(f'Prediction for sample {sample}: {"Popular" if prediction == 1 else "Not Popular"}')

    # Close the TensorBoard writer
    writer.close()


if __name__ == "__main__":
    main()